
Guide to DIY Upcycled Soy Candles
If you’re somebody who likes to set a cozy vibe with the flickering light and soothing scent of a candle, you should consider DIYing them!
Why? First of all it’s more affordable than buying them retail, especially if you prefer a high quality wax like soy or coconut over the standard paraffin. You can tailor the scent to your preferences using your favorite essential or fragrance oils. Additionally, buying in bulk and re-using old glass, ceramic, or metal containers (like a tea tin or glass jar) is a great way to be eco-friendly!
What’s more is that unlike some other craft hobbies, candle making is very beginner-friendly and anyone can learn how to do it. So let’s dive in!
MATERIALS NEEDED:

- Wax of your choice (I use soy) -- 1 pound is enough for three 8 oz candles
- Wicks of your choice (I use wooden and hemp wicks)
- Essential or fragrance oil
- Aluminum, glass, or ceramic pitcher (NO PLASTIC)
- Pot to use as double boiler
- Hot glue gun
- Thermometer
- (optional) dried flowers to mix in
THE PROCESS
Step 1: Melt the Wax
- Place a large pot on the stove and fill it halfway with hot water.

- Measure out the needed amount of wax and pour it into the aluminum pitcher. A good rule of thumb is if you fill up your container twice with wax chips, this should equal the needed amount when pouring the melted wax.
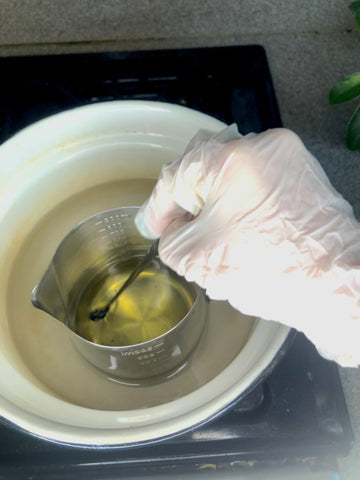
- Put the pitcher into the water of the double boiler on high heat (but keep an eye on the wax - it should never be hot enough for the wax to reach a rolling boil.)

- Once it is melted, you’ll need to let it cool to at least 140℉ so that it doesn’t evaporate the fragrance of the essential oils (note: chemical fragrance oils can handle higher heats). Pouring the wax into the container when it’s too hot can also result in the glass cracking.
Step 2: Prep the Containers
- While you’re waiting for the wax to cool, it’s time to prep your containers.

- Wash and dry them well.
- If you’re using a wooden wick, attach it to the metal bracket, and hot glue it in place to the bottom of the container. You can also use double sided stickers made especially for this purpose and easily found online.

- Place the wick into the center of the candle, press down firmly.
- If your container is wide (4’’ or more), use two wicks.

Step 3: Add Essential/Fragrance Oils and Pour
- Once the wax reaches ~140 - 130℉, it’s time to add essential oils.

- How much oil should you add?
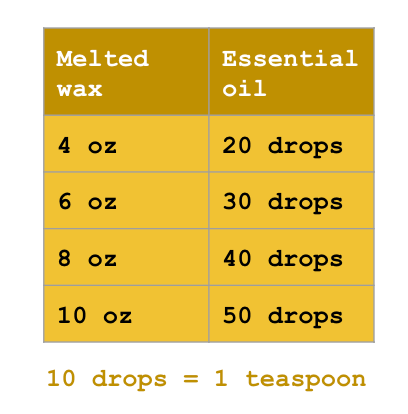

- Stir it (with the thermometer or a butter knife) for 60 seconds.
- Pour it slowly and steadily into your container! Woohoo your candle is officially born!

Step 4: Add Mix Ins (Optional)
- Once the wax starts to get opaque, it’s time to add mix ins (like dried floral bits or crystals)

- Keep them away from the wick to prevent a fire hazard

Step 5: Trim the wicks and enjoy!
- Wait 24 hours for the wax to cool and trim the wicks to about 1/2 inch tall.

- Your candle is ready to burn and enjoy!

If you liked this guide, you can check out my Instagram where I have more tips and tricks for candle lovers like how to clean out old candle containers and making a Frankencandle with scraps. This guide is an adapted version of the instruction I provide in my candle making workshops. In workshops, we dive deeper into the process and I troubleshoot the various issues that can arise during the process like the wax cracking, bubbling, or not burning properly. I also sell a kit that gives you everything you need to easily get started.
I hope you have tons of fun experimenting with candle making! Have any questions about candlemaking? Feel free to leave them below!
0 comments